本篇文章再来分享一下网站优化加速方法:开启TLSV1.3和Brotli压缩。相对于TLSV1.2,TLSV1.3主要是减少握手延迟,提高跨协议攻击的难度,使互联网更快,更多安全。Brotli是由谷歌开发的压缩算法,与其他压缩算法相比,它有着更高的压缩效率。
一般来说我们的VPS主机已经默认开启了GZIP压缩了,而Brotli与GZIP可以同时共存,当同时开启两种压缩算法时,Brotli 压缩等级优先级高于 Gzip。实际上,最新版的宝塔BT面板、Oneinstack和LNMP都已经默认可以开启TLSV1.3,各大面板使用:服务器控制面板榜单。
更多的关于网站服务器优化与加速,这里有:
- VPS主机加速方法 – 一键安装加速模块 从“软件”上提升VPS主机速度
- Cloudflare Partner接入管理Cloudflare CDN-启用Railgun动态加速
- 自建CDN加速-Nginx反向绑定,缓存加速,自动更新缓存和获取真实IP
PS:2019年9月29日更新,由于Google主导开发的服务器优化神器ngx_pagespeed,集成了图片延迟加载、自适应webp、JS和CSS优化、图片优化等一整套优化工具:PageSpeed服务器优化神器-Nginx部署ngx_pagespeed模块和加速效果体验。
一、开启TLSV1.3
1.1 Oneinstack TLSV1.3
PS:2019年1月17日更新,最新版的Oneinstack已经默认开启TLSV1.3了,所以如果你是全新安装的Oneinstack,安装完成后就启用了TLSV1.3了。
Oneinstack面板的安装与使用参考:OneinStack一键安装脚本。如果你是全新安装Oneinstack,则可以按照教程先将Oneinstack一键包下载到本地,不要执行安装。而是选择oneinstack目录,编辑version.txt,把openssl_version版本号改到1.1.1以上。
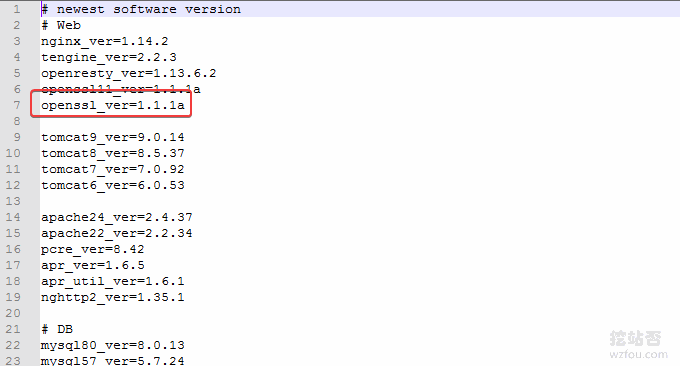
然后开始安装即可。如果你已经是Oneinstack的老用户了,方法类似,先升级一下Oneinstack,修改version.txt的openssl_version版本号,执行Oneinstack自带的升级脚本,升级一下Nginx。然后就可以看到openssl已经升级了。
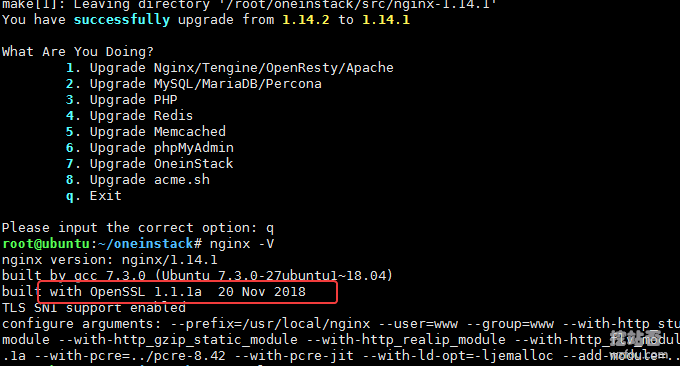
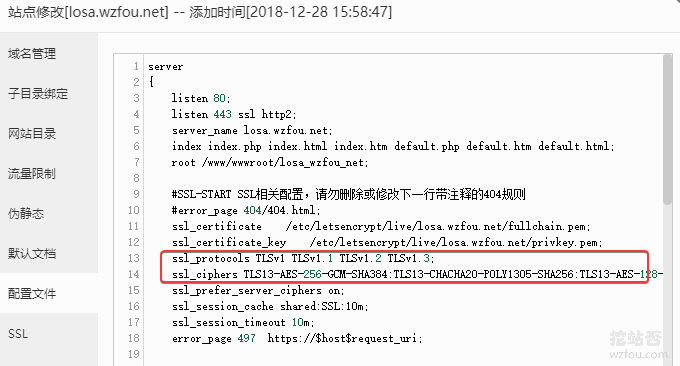
最后就是修改你的网站Nginx配置文件了,在ssl_protocols 后面添加TLSv1.3,在ssl_ciphers添加数个加密套件,重启Nginx完成。以下是我的Nginx的TLSv1.3配置,ssl_ciphers 的TLSv1.3部分是新增加的。
ssl_protocols TLSv1 TLSv1.1 TLSv1.2 TLSv1.3;

ssl_ciphers TLS13-AES-256-GCM-SHA384:TLS13-CHACHA20-POLY1305-SHA256:TLS13-AES-128-GCM-SHA256:TLS13-AES-128-CCM-8-SHA256:TLS13-AES-128-CCM-SHA256:EECDH+CHACHA20:EECDH+CHACHA20-draft:EECDH+ECDSA+AES128:EECDH+aRSA+AES128:RSA+AES128:EECDH+ECDSA+AES256:EECDH+aRSA+AES256:RSA+AES256:EECDH+ECDSA+3DES:EECDH+aRSA+3DES:RSA+3DES:!MD5;
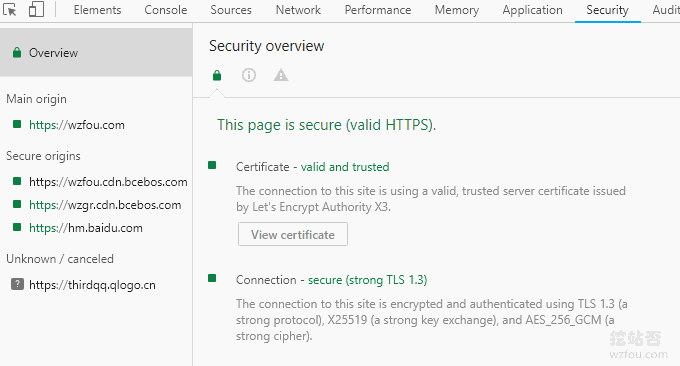
现在打开Chrome就可以看到wzfou.com已经成功使用了TLSv1.3。(PS:现在浏览器更新的速度很快,除IE,Chrome和Firefox新版对于TLSv1.3都已经支持了)
1.2 LNMP TLSV1.3
LNMP面板参考:Linux VPS建站工具,目前LNMP 1.6版本已经默认支持TLSv1.3(LNMP 1.6安装与使用-自动开启TLS 1.3),你只需要按照上面的操作调整一下你的网站Nginx配置就可以开启TLSv1.3。如果你用的是LNMP 1.5的话,可以使用升级命令:upgrade1.x-1.6.sh 升级一下管理脚本。
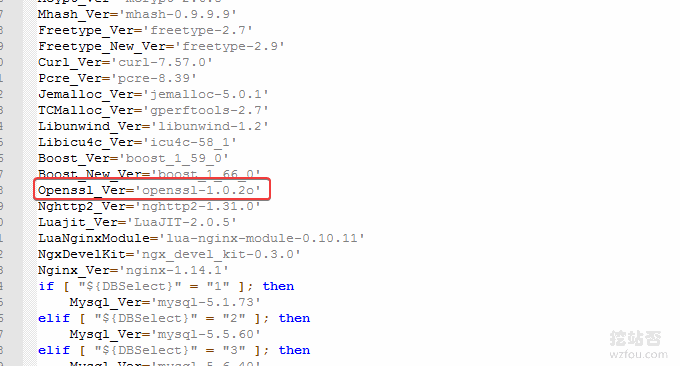
然后使用1.6的升级脚本升级一下nginx就可以了。如果你不想让LNMP 1.5升级到LNMP 1.6,则打开 \lnmp1.5\include\version.sh 文件,将 Openssl_Ver='openssl-1.0.2o' 修改为:Openssl_Ver='openssl-1.1.1a'。
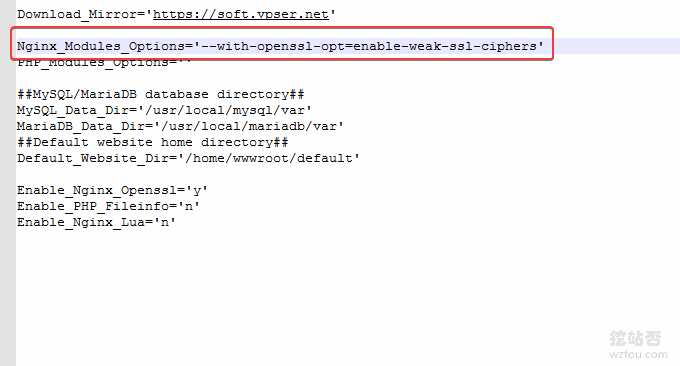
然后修改 \lnmp1.5\lnmp.conf 文件,将 Nginx_Modules_Options='' 改为:Nginx_Modules_Options='--with-openssl-opt=enable-weak-ssl-ciphers'(注:enable-weak-ssl-ciphers 作用是让 OpenSSL 继续支持 3DES 等不安全 Cipher Suite,如果你打算继续支持 IE8,才需要加上这个选项;若不需要支持 XP IE8 访问可忽略此处修改)
进入 lnmp1.5 目录,执行命令:
./upgrade.sh nginx
然后输入需要升级的 nginx 版本号,如目前最新的 1.15.7。nginx 最新版本号可从官网获取:http://nginx.org。静待编译完成。执行 nginx -V 可查询详细配置信息:
Checking ...
Program will display Nginx Version......
nginx version: nginx/1.15.7
======== upgrade nginx completed ======

nginx version: nginx/1.15.7
built by gcc 4.8.5 20150623 (Red Hat 4.8.5-28) (GCC)
built with OpenSSL 1.1.1a  20 Nov 2018
TLS SNI support enabled
configure arguments: --user=www --group=www --prefix=/usr/local/nginx --with-http_stub_status_module --with-http_ssl_module --with-http_v2_module --with-http_gzip_static_module --with-http_sub_module --with-stream --with-stream_ssl_module --with-openssl=/root/lnmp1.5/src/openssl-1.1.1a --with-openssl-opt=enable-weak-ssl-ciphers
修改主机配置文件,加入TLSv1.3配置,如下(和上面的Oneinstack是一样的)。文件修改完,重启一下 nginx,然后就可以去浏览器访问验证一下。
ssl_protocols 加入 TLSv1.3 支持,如:ssl_protocols TLSv1 TLSv1.1 TLSv1.2 TLSv1.3;

#ssl_ciphers 参考配置:

ssl_ciphers TLS13-AES-256-GCM-SHA384:TLS13-CHACHA20-POLY1305-SHA256:TLS13-AES-128-GCM-SHA256:TLS13-AES-128-CCM-8-SHA256:TLS13-AES-128-CCM-SHA256:EECDH+CHACHA20:EECDH+CHACHA20-draft:EECDH+ECDSA+AES128:EECDH+aRSA+AES128:RSA+AES128:EECDH+ECDSA+AES256:EECDH+aRSA+AES256:RSA+AES256:EECDH+ECDSA+3DES:EECDH+aRSA+3DES:RSA+3DES:!MD;
1.3 宝塔BT面板 TLSV1.3
新版的宝塔BT面板,已经支持nginx1.15了,直接在“软件管理”页面切换nginx1.15即可。
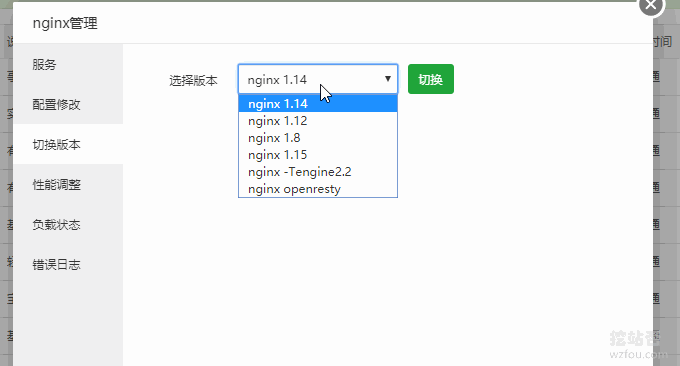
然后在网站的配置文件加上TLSv1.3相关配置就可以了。
ssl_protocols TLSv1 TLSv1.1 TLSv1.2 TLSv1.3;
#ssl_ciphers EECDH+CHACHA20:EECDH+AES128:RSA+AES128:EECDH+AES256:RSA+AES256:EECDH+3DES:RSA+3DES:!MD5;
ssl_ciphers TLS13-AES-256-GCM-SHA384:TLS13-CHACHA20-POLY1305-SHA256:TLS13-AES-128-GCM-SHA256:TLS13-AES-128-CCM-8-SHA256:TLS13-AES-128-CCM-SHA256:EECDH+CHACHA20:EECDH+CHACHA20-draft:EECDH+ECDSA+AES128:EECDH+aRSA+AES128:RSA+AES128:EECDH+ECDSA+AES256:EECDH+aRSA+AES256:RSA+AES256:EECDH+ECDSA+3DES:EECDH+aRSA+3DES:RSA+3DES:!MD5;
二、服务器SSL优化
SSL优化:
- 效果演示:https://www.ssllabs.com/ssltest/analyze.html?d=wzfou.com
如下图:
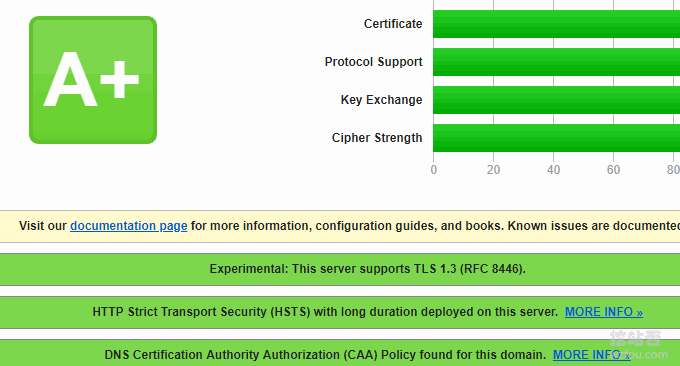
优化的方法除了本文讲到的开启TLSV1.3,优化的经验(主要是SSL双证书、HSTS)也在以下两篇文章中有分享过:
三、开启Brotli压缩
项目:
- https://github.com/google/ngx_brotli
3.1 Oneinstack Brotli
Oneinstack 开启 Brotli需要先进行编译,最简单的方法就是利用Oneinstack自带的升级脚本,将Brotli编译到Nginx,方法如下:
cd oneinstack/src
git clone https://github.com/google/ngx_brotli.git
cd ngx_brotli
git submodule update --init
#修改options.conf
nginx_modules_options中新增--add-module=../ngx_brotli
./upgrade.sh web nginx

#20190118更新,新版Oneinstack需要到oneinstack\include目录,找到upgrade_web.sh,修改:
 ./configure ${nginx_configure_args}
#新增:
 ./configure ${nginx_configure_args} --add-module=../ngx_brotli
#最后(执行升级,选择Nginx):
~/oneinstack/upgrade.sh

#修改/usr/local/nginx/conf/nginx.conf


    brotli             on;
    brotli_comp_level  6;
brotli_types text/plain text/css application/json application/x-javascript text/xml application/xml application/xml+rss text/javascript application/javascript image/svg+xml;或者直接手动编译Brotli到Nginx,该方法与wzfou.com之前分享的Oneinstack编译ngx_cache_purge模块是一样的:
cd oneinstack/src
git clone https://github.com/google/ngx_brotli.git
cd ngx_brotli
git submodule update --init

#以下几个安装包都是Oneinstack自带的,不同的版本可能会不同,请根据情况下载到/root/oneinstack/src/并解压
tar xzf nginx-1.14.2.tar.gz
tar xzf pcre-8.42.tar.gz
tar xzf openssl-1.1.1a.tar.gz
cd /root/oneinstack/src/nginx-1.14.2
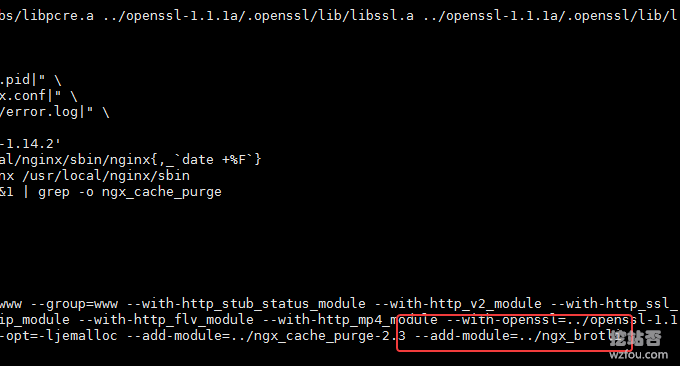
nginx -V #查看nginx编译参数,最后加上--add-module=../ngx_brotli

./configure --prefix=/usr/local/nginx --user=www --group=www --with-http_stub_status_module --with-http_v2_module --with-http_ssl_module --with-http_gzip_static_module --with-http_realip_module --with-http_flv_module --with-http_mp4_module --with-openssl=../openssl-1.1.1a --with-pcre=../pcre-8.42 --with-pcre-jit --with-ld-opt=-ljemalloc --add-module=../ngx_cache_purge-2.3 --add-module=../ngx_brotli


make  #编译
mv /usr/local/nginx/sbin/nginx{,_`date +%F`}  #备份nginx
cp objs/nginx /usr/local/nginx/sbin
nginx -V
Nginx Brotli编译成功。
打开你的网站的Nginx配置文件,添加以下代码:
#修改/usr/local/nginx/conf/nginx.conf


    brotli             on;
    brotli_comp_level  6;
    brotli_types       text/plain text/css application/json application/x-javascript text/xml application/xml application/xml+rss text/javascript application/javascript image/svg+xml;
如下图:
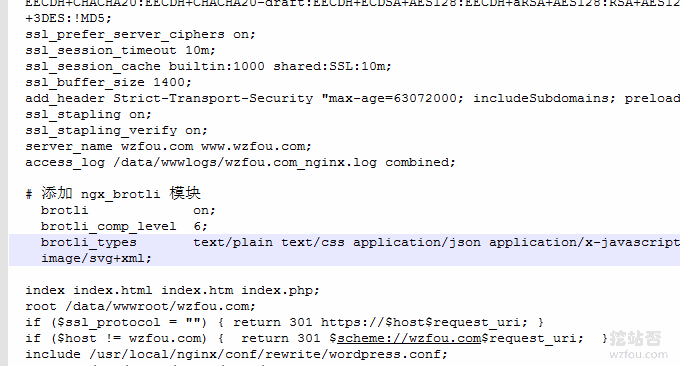
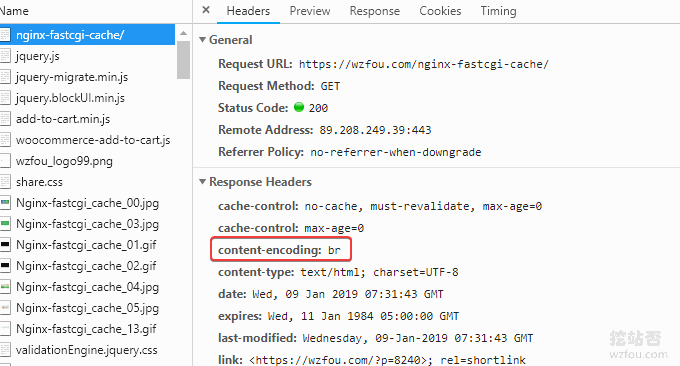
重启Nginx,刷新网页,利用Chrome审查元素,就可以看到网页显示“br”字样,表示使用了Brotli压缩。
3.2 LNMP Brotli
在LNMP上编译Brotli类似于上面的Oneinstack,首先也是将Brotli下载到本地,然后编辑一下配置,重新编译一下Nginx即可。命令如下:
#下载
cd lnmp1.5/src
git clone https://github.com/google/ngx_brotli.git
cd ngx_brotli
git submodule update --init
#编辑配置,请根据你自己的路径调整
vi /root/lnmp1.5/lnmp.conf
#添加
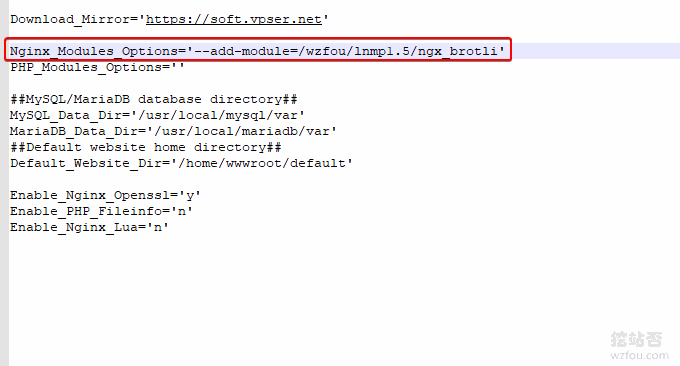
Nginx_Modules_Options='--add-module=/wzfou/lnmp1.5/ngx_brotli'
#最后,重新重新编译或者升级Nginx
cd /root/lnmp1.5
./upgrade.sh nginx
编辑配置文件如下:
最后,还是修改你的网站配置加入Brotli代码。
brotli             on;
brotli_comp_level  6;
brotli_types       text/plain text/css application/json application/x-javascript text/xml application/xml application/xml+rss text/javascript application/javascript image/svg+xml;
3.3 宝塔面板 Brotli
宝塔面板编译 Brotli也一样,利用宝塔自带的脚本:www/server/panel/install/nginx.sh对Nginx重新编译和升级,代码如下:
#安装libbrotli
cd /www/server
git clone https://github.com/bagder/libbrotli
cd libbrotli
./autogen.sh
./configure
make && make install

#下载ngx_brotli模块及其依赖:
cd /www/server
git clone https://github.com/google/ngx_brotli
cd ngx_brotli && git submodule update --init

#获取Nginx Arguments
nginx -V

#编辑配置
vi /www/server/panel/install/nginx.sh

#在你需要安装的Nginx版本下增加:--add-module=/www/server/ngx_brotli

  if [ "${nginx_version}" == "1.12.2" ] || [ "${nginx_version}" == "1.14.2" ];then
    ./configure --user=www --group=www --prefix=${Setup_Path} --with-openssl=${Update_Path}/src/openssl --add-module=${Update_Path}/src/ngx_devel_kit --add-module=${Update_Path}/src/lua_nginx_module --add-module=${Update_Path}/src/ngx_cache_purge --add-module=${Update_Path}/src/nginx-sticky-module --with-http_stub_status_module --with-http_ssl_module --with-http_image_filter_module --with-http_v2_module --with-http_gzip_static_module --with-http_gunzip_module --with-stream --with-stream_ssl_module --with-ipv6 --with-http_sub_module --with-http_flv_module --with-http_addition_module --with-http_realip_module --with-http_mp4_module --with-ld-opt="-Wl,-E" --with-pcre=pcre-${pcre_version} ${jemallocLD} --add-module=/www/server/ngx_brotli
  elif [ "${nginxVersion}" == "1.15.6" ]; then
    ./configure --user=www --group=www --prefix=${Setup_Path} --with-openssl=${Setup_Path}/src/openssl --add-module=${Setup_Path}/src/ngx_devel_kit --add-module=${Setup_Path}/src/lua_nginx_module --add-module=${Setup_Path}/src/ngx_cache_purge --add-module=${Setup_Path}/src/nginx-sticky-module --with-http_stub_status_module --with-http_ssl_module --with-http_v2_module --with-http_image_filter_module --with-http_gzip_static_module --with-http_gunzip_module --with-stream --with-stream_ssl_module --with-ipv6 --with-http_sub_module --with-http_flv_module --with-http_addition_module --with-http_realip_module --with-http_mp4_module --with-ld-opt="-Wl,-E" --with-openssl-opt="enable-tls1_3 enable-weak-ssl-ciphers" ${jemallocLD} --add-module=/www/server/ngx_brotli
  elif [ "$nginx_version" == "openresty" ]; then
    ./configure --user=www --group=www --prefix=${Setup_Path} --with-openssl=${Update_Path}/src/openssl --with-pcre=pcre-${pcre_version} --add-module=${Update_Path}/src/ngx_cache_purge --add-module=${Update_Path}/src/nginx-sticky-module --with-luajit --with-http_stub_status_module --with-http_ssl_module --with-http_image_filter_module --with-http_v2_module --with-http_gzip_static_module --with-http_gunzip_module --with-stream --with-stream_ssl_module --with-ipv6 --with-http_sub_module --with-http_flv_module --with-http_addition_module --with-http_realip_module --with-http_mp4_module --with-ld-opt="-Wl,-E" ${jemallocLD}
  elif [ "${nginxVersion}" = "-Tengine2.2.3" ]; then
    ./configure --user=www --group=www --prefix=${Setup_Path} --with-openssl=${Update_Path}/src/openssl --add-module=${Update_Path}/src/ngx_devel_kit --add-module=${Update_Path}/src/lua_nginx_module --add-module=${Update_Path}/src/ngx_cache_purge --add-module=${Update_Path}/src/nginx-sticky-module --with-http_stub_status_module --with-http_ssl_module --with-http_image_filter_module --with-http_v2_module --with-http_gzip_static_module --with-http_gunzip_module --with-ipv6 --with-http_sub_module --with-http_flv_module --with-http_addition_module --with-http_realip_module --with-http_mp4_module --with-ld-opt="-Wl,-E" --without-http_upstream_session_sticky_module --with-pcre=pcre-${pcre_version} --add-module=/www/server/ngx_brotli

#最后,重新编译Nginx(请根据自己的需要来选择)
sh /www/server/panel/install/nginx.sh install 1.14
最后,在你的网站的Nginx配置中加入Brotli代码即可。
brotli             on;
brotli_comp_level  6;
brotli_types       text/plain text/css application/json application/x-javascript text/xml application/xml application/xml+rss text/javascript application/javascript image/svg+xml;
关于Brotli一些参数的说明,你可以根据自己的需要来调整:
  brotli on;              #启用
  brotli_comp_level 6;    #压缩等级,默认 6,太高的压缩水平可能需要更多的 CPU
  brotli_buffers 16 8k;   #请求缓冲区的数量和大小
  brotli_min_length 20;   #指定压缩数据的最小长度,只有大于或等于最小长度才会对其压缩。这里指定 20 字节
  brotli_types *;         #指定允许进行压缩类型
# brotli_types text/plain application/javascript application/x-javascript text/javascript text/css application/xml text/html application/json image/svg application/font-woff application/vnd.ms-fontobject application/vnd.apple.mpegurl image/x-icon image/jpeg image/gif image/png image/bmp;
  brotli_static always;   #是否允许查找预处理好的、以 .br 结尾的压缩文件,可选值为 on、off、always
  brotli_window 512k;     #窗口值,默认值为 512k
四、总结
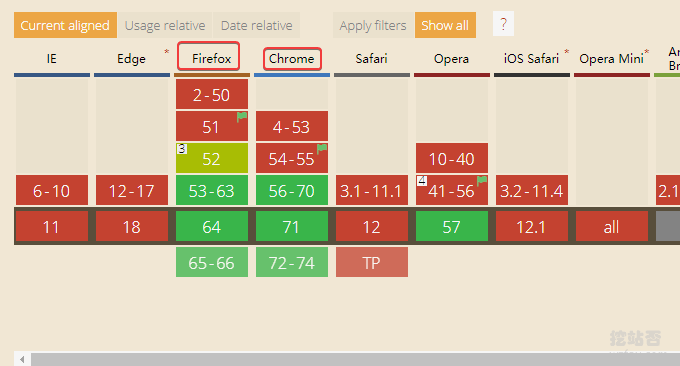
要不要用TLSV1.3?总得来看,TLSV1.3是未来的趋势,有人担心浏览器不支持,其实除了IE,最新版的Chrome和Firefox都是支持TLSV1.3的,各大浏览器支持TLSV1.3情况见:https://caniuse.com/#feat=tls1-3
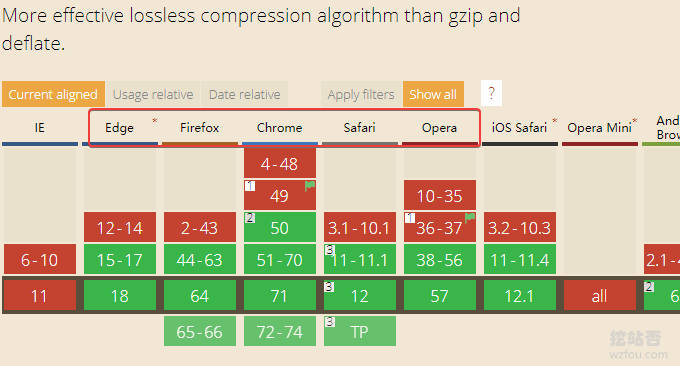
要不要用Brotli?理论上讲Brotli压缩比比GZIP要高不少,所以对于网页打开速度也是有一定作用的,不过想要秒开的感觉,还是先从硬件上提升一下速度吧,这里是各大浏览器支持Brotli的情况:https://caniuse.com/#feat=brotli
有没有有一键自动开启TLSV1.3和Brotli?有,如果你用的是CloudFlare免费CDN加速,CF已经为所有的网站自动开启TLSv1.3和Brotli,加速效果可以见我的演示站:losv.wzfou.net。

0