仅限KVM VPS,需更换内核。其他BBR脚本:
a、TCP加速:BBR 一键安装
b、TCP加速:BBR 增强版 for Debian/Ubuntu
c、OpenVZ VPS 安装 Google BBR 一键脚本
安装过程如下:
1、将系统内核更换成 4.12 内核
rpm -ivh https://zhujiwiki.com/usr/uploads/2017/11/kernel-ml-4.12.10-1.el6.elrepo.x86_64.rpm
然后重启。
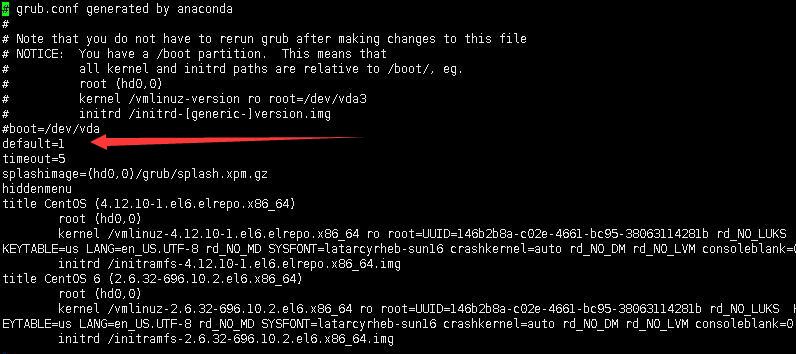
2、修改引导文件
vi /boot/grub/grub.conf

将 default=1 改成default=0,然后重新启动。
3、查看当前是否使用的是4.12.10-1的内核
uanme -a

4、更新以下文件
yum remove kernel-headers -y
rpm -ivh https://zhujiwiki.com/usr/uploads/2017/11/kernel-ml-headers-4.12.10-1.el6.elrepo.x86_64.rpm
rpm -ivh https://zhujiwiki.com/usr/uploads/2017/11/kernel-ml-devel-4.12.10-1.el6.elrepo.x86_64.rpm
5、进行BBR魔改操作
yum install -y make gcc
wget -O ./tcp_tsunami.c https://zhujiwiki.com/usr/uploads/2017/11/tcp_tsunami.c
echo "obj-m:=tcp_tsunami.o" > Makefile
make -C /lib/modules/$(uname -r)/build M=`pwd` modules CC=/usr/bin/gcc
chmod +x ./tcp_tsunami.ko
cp -rf ./tcp_tsunami.ko /lib/modules/$(uname -r)/kernel/net/ipv4
insmod tcp_tsunami.ko
depmod -a
echo "net.core.default_qdisc=fq" >> /etc/sysctl.conf
echo "net.ipv4.tcp_congestion_control=tsunami" >> /etc/sysctl.conf
6、运行 sysctl -p 将内核参数生效。
7、重启。
8、查看是否成功
lsmod | grep tsunami
